# 在 Magento2 中增加命令行
**URL:** https://forum.magentochina.org/t/%E5%9C%A8-magento2-%E4%B8%AD%E5%A2%9E%E5%8A%A0%E5%91%BD%E4%BB%A4%E8%A1%8C/730
**Category:** Magento 2.X
**Tags:** 教程, magento2, 开发
**Created:** [2020 年6 月 16 日 16:29 UTC](https://forum.magentochina.org/t/%E5%9C%A8-magento2-%E4%B8%AD%E5%A2%9E%E5%8A%A0%E5%91%BD%E4%BB%A4%E8%A1%8C/730 "2020-06-16T16:29:43Z")
**Posts on this page:** 1
**Page:** 1
### 作者:  [@Vicky](https://forum.magentochina.org/u/Vicky)
#### 发布日期: [2020 年6 月 16 日 16:29 UTC](https://forum.magentochina.org/t/%E5%9C%A8-magento2-%E4%B8%AD%E5%A2%9E%E5%8A%A0%E5%91%BD%E4%BB%A4%E8%A1%8C/730/1 "2020-06-16T16:29:43Z")
在这篇文章里,我们将了解如何将命令行添加到 Magento2 控制台命令行界面中。Magento2 添加命令行后可以使用界面快速更改某些功能,如:
- 安装 Magento(和相关任务,如创建和更新数据库架构,新建部署配置等等)
- 清除缓存
- 管理索引,包括重建
- 新建翻译字典和翻译包
- 为插件生成不存在的类,如工厂类和拦截器类 ;为对象管理器生成依赖注入配置
- 部署静态视图文件
- 从 LESS 生成 CSS
在开始之前,请花费几分钟去了解一下在 Magento2 命令行界面的命名。
我们将会使用 Mageplaza\_HelloWorld 这个模块来进行演示。
要向Magento 2 命令行界面添加选项,我们将执行以下步骤:
### 第一步:在 di.xml 文件中定义命令
在 di.xml 文件中,可以使用名为 Magento\Framework\Console\CommandList 的类型来定义命令选项
文件: app/code/Mageplaza/HelloWorld/etc/di.xml
```auto
- Mageplaza\HelloWorld\Console\Sayhello
```
此配置声明了一个命令类 Sayhello ,这个类定义了命令的名字和方法 execute() 。
### 第二步:创建命令类
因为在 di.xml 文件中进行了定义,所以现在创建一个命令类:
文件: app/code/Mageplaza/HelloWorld/Console/Sayhello.php
```auto
setName('example:sayhello');
$this->setDescription('Demo command line');
parent::configure();
}
protected function execute(InputInterface $input, OutputInterface $output)
{
$output->writeln("Hello World");
}
}
```
在这函数中,定义两个方法:
- configure() 方法用来设置 magento2 添加命令行的名称,描述,命令行参数
- 当通过控制台使用命令时侯,execute() 方法就会被调用执行
声明类后,请刷新 Magento 缓存并且输入以下命令:
```auto
php magento --list
```
你将会看到整个命令列表。命令如下
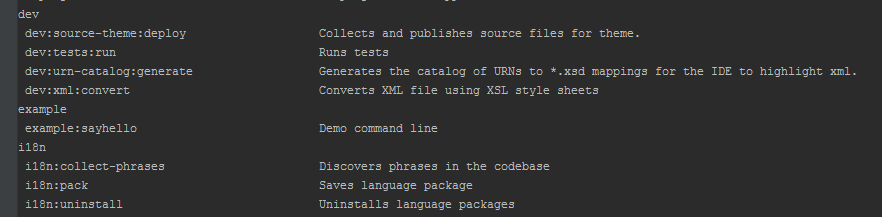
现在你可以执行 bin/magento example:sayhello 命令并查看结果

现在,我们为命令添加一些参数。
内容如下:
```auto
setName('example:sayhello')
->setDescription('Demo command line')
->setDefinition($options);
parent::configure();
}
protected function execute(InputInterface $input, OutputInterface $output)
{
if ($name = $input->getOption(self::NAME)) {
$output->writeln("Hello " . $name);
} else {
$output->writeln("Hello World");
}
return $this;
}
}
```
我们在 configure() 函数里为命令定义了参数 name 并在 execute() 函数中获取了它。请清除缓存并在命令行中执行 php bin/magento example:sayhello --name=“Join” ,查看执行结果为 “Hello Join” 。
## 本教程翻译自Mageplaza模块开发系列,其他内容请点击下面链接:
> [@Magento2模块开发中文教程索引](https://forum.magentochina.org/t/magento2%E6%A8%A1%E5%9D%97%E5%BC%80%E5%8F%91%E4%B8%AD%E6%96%87%E6%95%99%E7%A8%8B%E7%B4%A2%E5%BC%95/36):
>
> 本文翻译自mageplaza的Magento2模块开发教程,而且正在翻译中. 翻译也是非常好的学习方式,希望下列表中还有我们没有翻译,而你又想分享的内容,请发表文章之后,在下面附上地址。 如果觉得本站翻译得内容对您有帮助,又没有时间帮助翻译回馈社区.请打赏我们,您的支持是我们的动力: 转载说明:非常欢迎转载,但是必须保证文章的完整性并附上原文地址和翻译原文的地址,保证阅读者不会产生歧义. 目录索引: 索 引 中 文 原 文 1 [Magento2如何创建模块](https://forum.magentochina.org/t/Magento-2%E5%A6%82%E4%BD%95%E5%88%9B%E5%BB%BA%E6%A8%A1%E5%9D%97%E6%95%99%E7%A8%8B/38)[How to Create Module in Magento 2](https://www.mageplaza.com/kb/how-create-hello-world-module-magento-2.html) 2 [控制器详解](https://forum.magentochina.org/t/Magento-2%E6%8E%A7%E5%88%B6%E5%99%A8%E8%AF%A6%E8%A7%A3%E6%95%99%E7%A8%8B/39)[Create Controllers](https://www.mageplaza.com/magento-2-module-development/how-to-create-controllers-magento-2.html) 3 [CRUD 模型](https://forum.magentochina.org/t/Magento2-CRUD%E6%A8%A1%E5%9E%8B%E8%B5%84%E6%BA%90%E9%9B%86%E5%90%88%E5%B7%A5%E5%8E%82%E5%AF%B9%E8%B1%A1%E8%AF%A6%E8%A7%A3%E6%95%99%E7%A8%8B/43)[CRUD Models](https://www.mageplaza.com/magento-2-module-development/how-to-create-crud-model-magento-2.html) 4 [视图层:块,布局和模板](https://forum.magentochina.org/t/%E8%A7%86%E5%9B%BE%E5%B1%82%E5%9D%97%E5%B8%83%E5%B1%80%E5%92%8C%E6%A8%A1%E6%9D%BF%E6%A8%A1%E6%9D%BF%E6%95%99%E7%A8%8B/50/1)[View: Block, Layouts and templates](https://www.mageplaza.com/magento-2-module-development/view-block-layout-template-magento-2.html) 5 [配置system.xml](https://forum.magentochina.org/t/%E5%A6%82%E4%BD%95%E5%88%9B%E5%BB%BA%E7%B3%BB%E7%BB%9F%E9%85%8D%E7%BD%AE%E6%96%87%E4%BB%B6systemxml/55)[Configuration - System.xm…](https://www.mageplaza.com/magento-2-module-development/create-system-xml-configuration-magento-2.html)